Dampness creeping up your walls is like a silent alarm for potential disaster in your home. Moisture barriers are the unsung heroes in the fight against the damaging effects of humidity. They shield your sanctuary from unseen moisture, the source of a myriad of problems.
Understanding a moisture barrier begins with peering beneath the surfaces. It’s more than just a piece of material; it’s a complex system designed to keep your home dry and protect its structural integrity. From crawl spaces to basements, moisture barriers come in various classes and materials, each with specific functions and benefits.
Step into the world of moisture barriers with this comprehensive guide. It will elucidate why a simple barrier is essential, from thwarting mold to keeping pests at bay, and guide you through installing one. Whether you’re a seasoned homeowner or a first-time buyer, this article arms you with the crucial knowledge to preserve the health of your home.
What is a Moisture Barrier?
A moisture barrier, also known as a vapor barrier, is a critical component designed to control the movement of moisture through building surfaces, such as walls and subfloors. It’s typically made of plastic or foil sheeting, and its primary purpose is to protect structures from potential damage caused by mold growth and rot, especially in damp areas like basements, ceilings, and crawl spaces.
The performance of moisture barriers is gauged by perms, a unit of measurement indicating the rate at which water vapor can pass through the material. The lower the perm rating, the more effective the barrier is at preventing moisture transmission.
Why Do I Need a Moisture Barrier?
- To prevent moisture buildup in crawl spaces, basements, and walls
- To protect against mold and structural damage
- To enhance the longevity and integrity of your building
Classes Of Moisture Barriers:
- Class I: Impermeable (less than 0.1 perms)
- Class II: Semi-impermeable (0.1 to 1 perms)
- Class III: Semi-permeable (1 to 10 perms)
When installing a moisture barrier, it is essential that it covers the entire area without gaps. Seams and junctions should be sealed with specialized tape to ensure an effective moisture block, thus safeguarding your home from the insidious effects of uncontrolled dampness.

Classes of Moisture Barriers
When addressing the prevention of moisture-related damage in construction, understanding the Classes of Moisture Barriers is crucial. The International Residential Code categorizes moisture barriers based on their permeability—who efficiently they prevent the transmission of water vapor. Permeability is quantified in perms, and the classifications are as follows: Class I, Class II, and Class III barriers, each designed for specific uses according to their permeation capabilities.
Class 1, Class 2, Class 3
Class 1 moisture barriers (Impermeable, less than 0.1 perms) offer the highest resistance to vapor diffusion and are considered the most robust defense against moisture ingress. Such barriers are recommended for use in areas with extreme moisture exposure.
Class 2 barriers (Semi-permeable, greater than 0.1 perms but less than or equal to 1.0 perms) provide a moderate level of vapor control and are suitable for applications with less severe moisture conditions.
Class 3 barriers (Permeable, greater than 1.0 perms and less than or equal to 10 perms) are the most permeable within the classification, designed for areas where moisture control is necessary but not as critical.
Types of Materials Used
Materials for Class 1 barriers include polyethylene sheets, rubber membranes, and metals like sheet metal and glass. These impermeable options are often used where a complete vapor lock is crucial.
Class 2 barrier materials are a bit more varied, encompassing 30-pound asphalt-coated paper, bitumen-coated kraft paper, plywood, and specific foam insulations.
Materials falling into Class 3 feature products like gypsum board, fiberglass insulation, and house wraps. These materials allow for a certain degree of breathability and are commonly used in residential settings where a balance between airflow and moisture control is desired.
Differences Between Moisture Barriers and Vapor Barriers
While both moisture barriers and vapor barriers aim to control the unwanted transfer of moisture, they differ in functionality. A moisture barrier refers to a broader category designed to block both liquid water and water vapor, whereas a vapor barrier specifically targets water vapor. Vapor barriers are typically installed on the warm side of a building envelope to prevent condensation from occurring within the insulated areas.
In terms of climate influence, vapor barriers are placed on the interior in cold climates and on the exterior in warm climates. On the other hand, moisture barriers are typically recommended for exterior walls, crawl spaces, and basements—where liquid water or ground moisture could pose a threat.
It’s important to select the right type of barrier based on the specific needs of the space in question, considering factors like climate, construction design, and the intended permeability. This is where understanding the differences and functions of Class 1, Class 2, and Class 3 barriers becomes critical in ensuring the structural integrity and longevity of buildings.

What does a moisture barrier do?
Installing a moisture barrier is a vital step in preserving the health and durability of your home. These barriers, also referred to as vapor barriers, are specifically designed to impede the passage of water vapor into your home’s structure, thus preventing potential moisture damage. In humid environments or in parts of the house that are susceptible to dampness—such as basements, ceilings, and crawl spaces—moisture barriers are especially critical. They protect floors and walls from the detrimental effects of mold, mildew, and water damage.
The placement of a moisture barrier is strategic and should be aligned with the climate of the region; typical installation is on the side of the insulation most exposed to heat and humidity. By limiting moisture ingress, a moisture barrier not only serves to protect your home but also enhances comfort and energy efficiency. This means potentially lower utility bills, as your air conditioning system no longer needs to work overtime to regulate indoor humidity levels.
Moreover, moisture barriers are an integral component in new home construction to shield the residence from moisture that can seep in through walls and over concrete subfloors. Their effectiveness keeps living spaces dry and free from harmful moisture accumulation.
Preventing Mold and Mildew Growth
Mold and mildew are not just unsightly; they pose significant health risks and can cause serious damage to your home. By controlling moisture, you can prevent these unwanted guests from ever taking root. Vapor and moisture barriers are essential in moisture-prone areas such as kitchens, bathrooms, crawl spaces, attics, walls, and basements. These barriers, especially those with lower permeability like Class 1 barriers made from metal, glass, or polyethylene sheets, are highly effective at keeping the area dry.
To maintain optimal moisture control, it’s important that these barriers remain intact; a continuous vapor retarder without damages or holes is crucial for preventing the passage of moisture that leads to mold and mildew. Regular inspection and maintenance can ensure that these barriers continue to perform their role effectively.
Termite And Pest Control
Aside from mold and mildew, moisture is a calling card for pests, particularly termites. These invaders can severely compromise the wood in your home, leading to structural weakness and, in extreme cases, collapse. Installing a moisture barrier acts as a strong line of defense against such infestations. By eliminating the attractive damp conditions, these barriers help deter pests including termites.
Areas that are naturally prone to dampness, such as basements and crawl spaces, can benefit enormously from moisture barriers. These barriers are a crucial preventative measure that can save homeowners from future headaches and costly repairs, contributing to the long-term protection of the property.
Protecting Structural Integrity of the Home
A home is more than just a shelter; it’s a significant investment that should last for generations. Moisture barriers play a crucial role in safeguarding this investment by preventing ground moisture from penetrating and potentially damaging the home’s foundation and structure. Exterior walls, crawl spaces, and basement floors are all areas that, when compromised by moisture, can lead to severe structural issues.
The effectiveness of a vapor or moisture barrier in preserving your home is measured in perms, with different classes offering varying levels of protection. In particular climates, building codes may dictate the mandatory use of Class I or II barriers to ensure the structural components of your home are adequately shielded from moisture.
Furthermore, when installing wood floors over concrete subfloors, moisture barriers are imperative to prevent damage like warping or buckling due to the moisture inherent in concrete. The placement of these barriers is carefully decided based on the local climate, ensuring maximum protection against moisture infiltration and maintaining the structural integrity of your home.

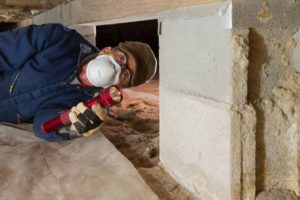
How To Install a Moisture Barrier
Installing a moisture barrier effectively is critical to ensure it performs as intended to protect your home from moisture damage. From selecting the right type of barrier for your specific needs to meticulous installation, each step is paramount in creating a reliable defense against moisture.
Steps for Proper Installation
- Initial Preparation: Before beginning, assess the area where the moisture barrier will be installed for proper ventilation. This helps to avoid any moisture-related issues in the future, such as air quality problems or moisture buildup.
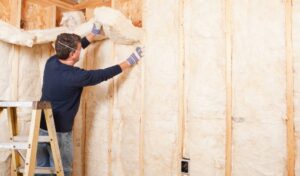
- Select the Right Barrier: Choose a moisture barrier that corresponds with the climate and the specific area of the home where it will be placed. The barrier’s permeability is a key factor here, with the aim of matching the barrier to the prevailing conditions.
- Install on the Correct Wall Side: Place the vapor barrier on the side of the insulation most likely to encounter heat and moisture. For interiors, this is typically the warm side to prevent moisture from entering and condensing within the wall cavity.
- Seal it Right: Apply appropriate sealing tape to cover up over the seams and eliminate any air gaps. This step is crucial as it maintains the continuity of the barrier and removes potential entry points for moisture.
- Overlap Sheets Properly: When laying the moisture barrier, ensure that sheets overlap by at least six inches. Use vapor barrier tape to bond these overlaps, forming an unbroken and robust moisture control system.
- Repair Damages: If you find any damages, punctures, or tears in the moisture barrier, repair them before proceeding with the installation. It’s essential to start with an intact sheet to ensure effective moisture blocking.
Common Mistakes to Avoid
- Wrong Barrier Type: Make sure you don’t use a barrier that’s not suited for your climate or the specific area of your home. This can render the barrier ineffective and potentially cause more harm than good.
- Incorrect Installation Side: A barrier installed on the wrong side of the wall can trap moisture in the structure, potentially leading to mold and other issues.
- Incomplete Coverage: Make sure there are no gaps, holes, or areas of incomplete coverage. These can compromise the entire moisture barrier system, allowing moisture to penetrate where it shouldn’t.
- Improper Sealing: Do not use non-resistant tape for sealing, as it may not withstand moisture exposure over time, leading to gaps and a failure to completely block moisture.
- Misplacement Relative to Insulation: The placement of a moisture barrier relative to the insulation can vary depending on climate. Be aware of whether the barrier should be installed towards the interior or exterior side of the insulation to optimize performance.
Adhering to the correct installation procedures and avoiding these common pitfalls will help ensure your home maintains a high level of protection against the damaging effects of excess moisture.
Need help? Call Attic Crew today for all your moisture barrier needs.